Poradniki/Tworzenie paczki zasobów
| Artykuł w budowie! Trwa budowa strony Poradniki/Tworzenie paczki zasobów.
Jeśli chcesz, możesz pomóc przy jej tworzeniu.
|
| Ten element dotyczy wyłącznie Java Edition. |
Rozpoczęcie
Wykonanie tego poradnika powinno zająć od jednej do półtora godziny.
Paczki zasobów mogą modyfikować tekstury, modele, animacje, dźwięki(w tym też muzykę), interfejs użytkownika oraz języki.
Czego nie robić
Jest kilka rzeczy, których nie powinieneś robić przy tworzeniu paczki zasobów. Oto ich lista:
- Robić cokolwiek, co łamie zasady użytkowania Minecrafta.
- Wydawać wersje Minecrafta lub modyfikacje, które pozwalają na granie bez potrzeby kupowania gry od Mojangu.
- Wydawać zdekompilowany kod źródłowy gry w jakikolwiek sposób.
Tworzenie paczki
Zacznij od nawigacji do folderu resourcepacks. Aby go znaleźć, najpierw musisz zlokalizować folder Minecrafta. Kiedy już znajdziesz się w folderze resourcepacks, utwórz nowy folder i nazwij go: "Poradnikowa_Paczka_Zasobów". Po tej czynności otwórz ten folder.
Pierwszą rzeczą jaką musimy zrobić jest stworzenie pliku pack.mcmeta. Pozwala on Minecraftowi rozpoznać folder jako paczkę zasobów i daje możliwość zmiany opisu widocznego podczas wybierania paczki w grze.
Tworzenie pliku MCMETA
Aby stworzyć plik MCMETA, kliknij prawym przyciskiem w folderze i utwórz nowy dokument tekstowy. Nazwij ten plik "pack.mcmeta".
Wymagania
- Każdy edytor tekstu powinien zadziałać, jednak zalecane jest używanie edytora tekstowego wykorzystującego programowanie IDE.
Upewnij się, że rozszerzenie pliku to .mcmeta a nie .txt kiedy zmieniasz mu nazwę. Otrzymasz ostrzeżenie, że zmiana rozszerzenia może sprawić, że plik będzie nieużyteczny.
Jest to w porządku!
Jeśli nie widzisz rozszerzeń plików, możesz je włączyć w zakładce Widok eksploratora i zaznaczając Rozszerzenia nazw plików.

pack.mcmeta
Otwórz pack.mcmeta w wybranym przez Ciebie edytorze tekstowym i skopiuj następujący kod:
 {
    "pack": {
       "pack_format": 5,
       "description": "Opis paczki"
    }
 }
pack_format
Jeśli grasz na starszej wersji, będziesz musiał zamienić 5 po "pack_format" w zależności od wersji.
Ten poradnik zakłada, że tworzysz paczkę na najnowszą wersję gry, co oznacza, że Twoja paczka zasobów może nie działać na starszych wersjach.
"pack_format" requires:
(Dla formatu paczki 3 i wyżej(1.11 i wyżej) wszystkie nazwy plików muszą mieć tylko małe litery)
Opis
Możesz nadać własny opis dla paczki zasobów. Jeśli uznasz, że potrzebujesz kilku specjalnych znaków, możesz poszukać ich kodów tutaj. Powiedzmy, że chcesz użyć takiej litery: Þ. Użyjesz wtedy kodu \u00DE. Upewnij się, że używasz \ zamiast zwykłego /. (Jedynie znaki 0000-FFFF (BMP) są wspierane przez Minecraft)
Ten plik jest napisany w formacie JSON! Bądź świadomy jak wszystko jest ułożone. Uważaj, aby nie zapominać o takich znakach jak cudzysłowia, dwukropki, oraz klamrowe bądź kwadratowe nawiasy. Jeśli w jakimś miejscu jednego z tych znaków zabraknie, może to spowodować niepoprawne działanie paczki!
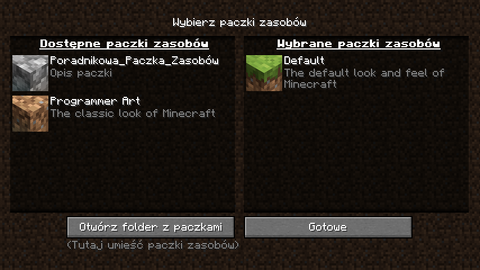
Testowanie paczki
Jesteśmy teraz gotowi do przetestowania paczki w grze! Otwórz Minecrafta i przejdź do ustawień, potem kliknij na Paczki zasobów. Powinno to wyglądać mniej więcej tak, jeżeli użyłeś kodu powyżej:
Rozwiązywanie problemów
Jeśli nie widzisz swojej paczki w grze, upewnij się, że plik pack.mcmeta jest poprawny. Jeśli nie jest, poszukaj brakujących klamrowych nawiasów { }, przecinków, dwukropków :, cudzysłowów "", oraz kwadratowych nawiasów [ ]. Pamiętaj, że dla każdej otwartej klamry, cudzysłowia, lub kwadratowego nawiasu, musisz mieć zamykającą klamrę, cudzysłów, oraz nawias kwadratowy.Upewnij się także, że plik ma format zwykłego tekstu, a nie tekst sformatowany.
Ikona paczki
Jeżeli ikona paczki nie zostanie zdefiniowana, będzie wyświetlana ikona bruku obok paczki.
Każdy obraz może zostać użyty, pod warunkiem, że jest nazwany pack.png. Plik pack.png musi mieć rozdzielczość 64 x 64 pikseli aby był poprawnie wyświetlany.
Dodawanie rzeczy
Modyfikacja tekstury moba
Teraz gdy już mamy nasza paczkę skonfigurowaną, pora zmodyfikować teksturę creepera!
Aczkolwiek, zanim to zrobimy, musimy utworzyć strukturę folderów, której Minecraft oczekuje, że będzie obecna w paczce. Aby to zrobić, wykonaj następujące czynności:
- Utwórz folder nazwany "assets" w folderze Poradnikowa_Paczka_Zasobów
- W folderze "assets", utwórz kolejny folder i nazwij go "minecraft"
- W "minecraft", stwórz folder "textures"
- W "textures", utwórz następny folder, nazywając go "entity"
- W "entity", utwórz folder "creeper"
- Skopiuj teksturę creepera z domyślnej paczki zasobów Minecrafta do nowo stworzonego folderu creeper w Twojej paczce. (Będziesz potrzebować archiwera plików, takiego jak 7zip, aby wyodrębnić domyślne tekstury. Przejdź do Windows: C:\Users\nazwa\AppData\Roaming\.minecraft\versions\wersja gry Linux: ~/.minecraft/versions/wersja gry i wypakuj plik .jar.W nowym wypakowanym folderze znajdź assets/minecraft/textures/entity.)
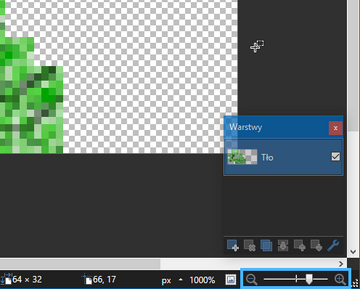
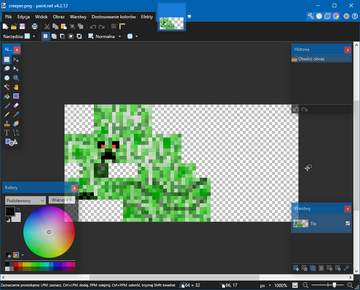
Teraz gdy już mamy teksturę creepera, otwórz ją w wybranym przez siebie edytorze graficznym obsługującym przezroczystość. Powinno to wyglądać jak poniżej:

Zauważysz, że tekstura jest dosyć mała. W programie PaintDotNet możesz kontrolować przybliżenie w prawym dolnym rogu.
- Szybka notatka na temat tekstur
Jeśli nigdy przedtem nie widziałeś tekstury, powyższy obraz może Cię zaskoczyć. Najlepiej wyobrazić sobie to jako zawijanie prezentu papierem do pakowania, tylko że naszym papierem w tym przypadku jest tekstura. Oto jak ułożona jest tekstura creepera:
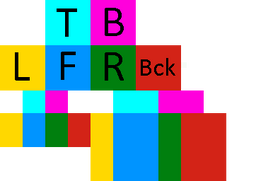
| Klucz | |
|---|---|
| T | Góra |
| B | Spód |
| L | Lewa strona |
| F | Przód |
| R | Prawa strona |
| Bck | Tył |
Obszary mające ten sam kolor są zwrócone w jednym kierunku(np. Niebieskie obszary są zwrócone w przód).
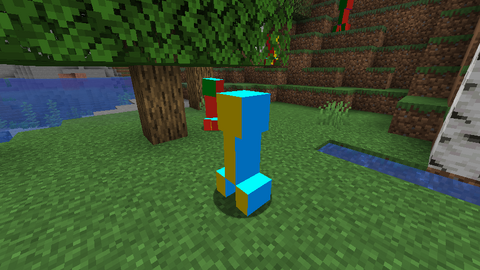
Jak to wygląda w grze:
Nadszedł czas na odrobinę kreatywności! Zedytuj teksturę creepera tak jak chcesz. Ja postanowiłem zmienić oczy na czerwone.
Kiedy już jesteś zadowolony ze swojej tekstury, zapisz plik jako .png i upewnij się, że nosi on nazwę "creeper". Gra będzie szukać tylko plików z poprawnymi nazwami.
Modeling Blocks/Items
Sometimes you may want to change one of the Minecraft models. Here is a quick and easy way on how to do it.
Requirement
- A 3D Modeling Editor like Blockbench. You can use other modeling editors but it is recommended to use this because it is easier to use and can export to
.jsonformat. - A ZIP viewer like 7zip for Windows. Other ZIP viewers can be used but this can view JAR files as well.
Replacing a Block
Because the default ladder in Minecraft isn't 3D, you can replace it with your own model. First, get all the ladder's files into this resource pack:
- Open the Minecraft JAR file using a ZIP viewer of your choice.
- Navigate into the
assets/minecraft/blockstatesfolder, then extractladder.jsontoTutorial_Resource_Pack/assets/minecraft/blockstates - Navigate into the
assets/minecraft/models/blockfolder, then extractladder.jsontoTutorial_Resource_Pack/assets/minecraft/models/block - Navigate into the
assets/minecraft/models/itemfolder, then extractladder.jsontoTutorial_Resource_Pack/assets/minecraft/models/item - Lastly, navigate into the
assets/minecraft/textures/blockfolder, then extractladder.pngtoTutorial_Resource_Pack/assets/minecraft/textures/block.
Now you can either edit the ladder.png using your preferred image editor, or you can edit it in your preferred modeling editor.
Modeling the Ladder
In modeling the ladder, we will use the recommended Blockbench. To open it, simply double-click it. After it has opened, press Ctrl+O to open the ladder model. After the open dialog has appeared, go to the location where you saved it and double click.
You then should be facing a ladder which is on the south side of the box.
- On the menu bar, go to "Edit -> Add Cube" to create a new block.
- Resize the model to a full sized cube. Then, under Textured on the left panel right click
ladder.png, then click Apply to Untextured Faces. - In the top left, there will be an image of the ladder, with a 1x1 highlighted region. Move this to change the texture to what you want it to be. Repeat until all sides of the block are as wanted.
- Press
Ctrl+Sto save inresourcepacks/Tutorial_Resource_Pack/assets/minecraft/textures/blocks/ladder.png(Replace "blocks" with "block" for 1.13 and above).
Now we have created the particle texture of the block when broken and the main texture.
Finishing off
When you have completed the 3D model of the ladder and saved it, launch Minecraft, and test it out. Place a ladder on a wall, and you should see its replaced model.
Custom music and sounds
Szablon:Info needed section You can change or add new music using a resource pack.
Changing music
In this example, you will learn how to change the boss music in the ender dragon fight.
Finding a sound's path
If you want to change sounds, you'll first need to know the path of the sound you want to change.
- Inside your .minecraft folder, navigate to
assets/indexes. - Find the
.jsonfile corresponding to your Minecraft version (e.g.1.15.json), and open it with a text editor. - In this file you can find all the sounds found in Minecraft. Press CTRL+F to search for your sound.
- For a list of filenames for music, you can check Music#List
- Your sound path will look something like this:
minecraft/sounds/music/game/end/boss.ogg
Modifying the sound
- Inside your resource pack folder, navigate to
assets/minecraft. - Create a new folder named
sounds. - Now inside your
soundsfolder, you need to create new folders depending on you sound's path. For example, if your path isminecraft/sounds/music/game/end/boss.ogg, you need to create the folderssounds/music/game/end. - In the last folder (in this example, it's
end) you can put in your new sound file. Make sure you named the file to the file that you're replacing, or in this example,boss.ogg.- Note that this file must be a
.oggfile. To convert your sound file to a.oggfile, you can use the free website Online-Convert.com
- Note that this file must be a
Testing your sound
If everything went according to plan, you have now replaced a sound in Minecraft. To test it:
- Make sure you have enabled your resource pack.
- If you already had Minecraft open with your resource pack enabled, you can press F3+T to reload all resource packs.
- Use the
/playsoundcommand to play your sound. In our example, type:/playsound minecraft:music.dragon master @s
Adding new sounds or music
In this example, a new player hurt sound can be added without replacing any of the current player hurt sounds.
Finding the location of the sounds
In order to add a sound, you'll need to know where it should actually go by determining its path. Unlike replacing sounds, you will go straight to your resource pack folder and search in there.
- Inside your .minecraft folder, navigate to
assets/indexes. - Find the
.jsonfile corresponding to your Minecraft version (e.g.1.15.json), and open it. - Press CTRL+F to search for your sound path.
- In this case, the location for the player hurt sounds will look like this:
minecraft/sounds/damage/.
- In this case, the location for the player hurt sounds will look like this:
Adding the folders and sound in your resource pack
- Inside your resource pack folder, navigate to
assets/minecraft. - Create a new folder named
sounds. - Create another sub-folder. Its name will depend on the path's name that you found. So in this case, in your
soundsfolder, create a folder nameddamage. - Add your sound here.
- Note that the sound must be a
.oggfile. Like in the previous section, you may use the free website Online-Convert.com. - Also note the already existing files seen in your
.jsonfile from above. In this case, five other hurt sounds exist within theminecraft/sounds/damage/folder, two for falling at different heights (fallbig.oggandfallsmall.ogg) and the other three are when the player actually gets hurt (hit1.ogg,hit2.ogg, andhit3.ogg) Since we want to add a fourth sound to the existing three hurt sounds, we cannot reuse those file names. For simplicity, name your soundhit4.ogg.
- Note that the sound must be a
Creating the sounds.json file
Because we are adding a sound, we must define where it will be used in sounds.json.
- Go back to
assets/minecraftin your resource pack folder. - Create a text file named
sounds.json. Do make sure that the file format is indeed .json and nothing else. - At your choice, paste the following template into
sounds.json.{ "entity.player.hurt": { "sounds": [ { "name": "damage/hit1" }, { "name": "damage/hit2" }, { "name": "damage/hit3" }, { "name": "damage/hit4" } ], "subtitle": "Hurt" } }
- The above code only applies to this example. Replace/rename anything necessary to allow it to apply to your chosen sound.
- You can find out the id used by Minecraft for each sound folder. By using
/playsoundin-game, you can determine this id. In this case, using/playsound minecraft:entity.player.hurt master @swill confirm that the player's hurt sound is indeed classified asentity.player.hurt.
- Correct
.jsonformatting is required! Any missing bracket, comma, etc. will result in the resource pack failing to work properly.
Testing your sound
If everything went according to plan, you have now added a sound in Minecraft. To test it:
- Make sure you have enabled your resource pack.
- If you already had Minecraft open with your resource pack enabled, you can press F3+T to reload all resource packs.
- Use the
/playsoundcommand once again to play your sound. In our example, type:/playsound minecraft:entity.player.hurt master @s. For this example, it will likely require multiple tries, as hurt sounds are chosen randomly.
Adding Languages
You can add new languages to Minecraft using a resource pack. Assume your language code is 'LANG'[1] and country/region code is 'COUNTRY',[2] pack.mcmeta will look like:
- pack.mcmeta
{
   "pack": {
      "pack_format": 5,
      "description": "Tutorial Resource Pack"
   },
   "language": {
      "LANG_COUNTRY": {
         "name": "Tutorial Language",
         "region": "Country/region name",
         "bidirectional": false
      }
   }
}
If you want your language to be right-to-left, set "bidirectional" to true.
Then, put LANG_COUNTRY.json in assets/minecraft/json inside your resource pack. When you launch the game, choose your resource pack, open the Language selection screen, and your new language will be there.
- Notes
The pack.mcmeta goes in the root folder of your resource pack, not in the assets/minecraft/lang folder. Also note that the above pack.mcmeta is the same file as the pack.mcmeta file that you have created a while ago. As of Java Edition 1.7-pre,Szablon:Verify you can choose multiple resource packs at once. If you want to use your new language and resource pack for before 1.7, you need to combine them manually because multiple resource packs could not be selected before the version.
Animation Properties
An example of an animation file is this:
- stone.png.mcmeta
{
   "animation": {
      "interpolate": true,
      "width": 1,
      "height": 7,
      "frametime": 1,
      "frames": [
         {
            "index": 0,
            "time": 0
         },
         1, 2, 3, 4, 5, 6, 4, 2
      ]
   }
}
- Note
All you really need to make a texture animated is the following code. By default, it will make each frame last only one tick:
- stone.png.mcmeta
{
  "animation": {}
}
Save the file as the same name as the texture you want animated with an .mcmeta in the same folder as your texture.
Texture Properties
An example of a texture property is this:
- shadow.png.mcmeta
{
   "texture": {
      "blur": false,
      "clamp": true
   }
}
Fonts
Character sizes in fonts are determined by the last line of pixels that contains pixels which contain a non-zero alpha. This allows additional padding to be added around characters by adding a color with an alpha level of 1, which Minecraft will consider as part of the character.
Testing your Resource Pack
- Launch the game
- Click on Options
- Click on Resource Packs
- Find "Tutorial Resource Pack" in the list on the left and click the arrow next to it
- Click Done
If you decide you want to make some changes to your resource pack, just close the game, edit your resource pack, relaunch the game, and follow the steps above to test your resource pack again. Alternatively, saving the texture to the resource pack and pressing F3+T will reload the pack without the need to close the game.
Packaging Resource Packs with Worlds
For using in singleplayer worlds, you can package your resource pack as a ZIP file named resources.zip inside the world directory. This will then be automatically used when playing the singleplayer world.
Server Resource Packs
If you are the owner of a server, you may set it as the resource pack of your server.
- Make sure, that your pack format is a .zip-folder.
- Upload the pack on a filehosting website, for example Dropbox(https://www.dropbox.com).
- Copy the download link of your pack. IMPORTANT: It has to be the direct download link, as an example for Dropbox the URL will end with "dl=0" If you're using Dropbox, all you have to do is changing it to "dl=1".
- Open the server.properties with a text editor.
- Search for the line "resource-pack=".
- Paste the download link behind the equal sign.
- Save your changes to the server-properties and restart your server.
- Enjoy!
Servers can have an icon that will show up in the Multiplayer list.
- Create a PNG image with a size of 64 by 64 pixels, transparency is supported.
- Save (or rename) it to
server-icon.png. - Move it to the server's directory.
- Restart the server.
- Server icons will display next to the server name.
References
Przypisy
Poniżej znajduje się lista przypisów na tej stronie.